Monday, April 15, 2013

Some New Features...


Added some outer coverings over the lanes to prevent the ball from jumping out of bounds and getting stuck (happens more frequently now that the ball moves faster). These are more or less placeholders until I get the time and energy to make better ones. For now, they are made of foam core with paper printouts of the same old wood texture I used for the inner walls. Not only does it effectively save the ball from getting stuck outside the playing field, it also makes it look really cool. Also finally broke down and used car wax to polish the heck out of the surface. I didn't do a full strip of the play field. I only removed the rails that go across the field from the right ramp to get it out of the way. After that, I added a generous layer of Armor All.


Added 2 blue LED strips across the inside on the bottom. Gives an eerie "haunted seas" look.

Here's a video of the new and improved machine in action...


Saturday, March 16, 2013

Simple Tip For Adding More Speed To The Ball

The other night I wanted to make the play field surface pop a little more. I don't have wax, which is what is used on real pinball machines. I don't know how well wax would work in this case because the artwork on the surface is actually just paper permanently adhered to a piece of medium density board. I did however had a bottle of Armor All. Yes folks, this stuff ain't just for cars. I use this on a ton of other stuff like hardwood furniture, speaker cabinets, etc.

Rather than spray directly to the surface (not recommended) I sprayed just a little bit on a folded up paper towel and started to gently wipe it around the surface. Then I wiped the excess off with a clean paper towel. This leaves an invisible slightly oily layer, making the surface slippery and smooth. When I started up the machine again and started playing.... WOOAH!!!! That ball just flies all over the play field. This added much more speed and drastically preserves the energy to the ball when hit by a flipper or bounced by a bumper. So count surface friction as another factor in the slow-ball movement issues. It's ridiculous how different it feels now. It feels far more like real pinball machine gameplay.

It's obvious now to this amateur that even though the ball is perfectly spherical and rolls around, much of the time it's slid around. Something I never thought of before. There's a reason bowling alleys heavily wax and lubricate their bowling lanes. If you watch the ball carefully, much of the time it's sliding rather than rolling, so a slick surface is critical for the ball to keep speed. Pinball machines are no different in this regard.

With each little simple adjustment the much maligned Zizzle machine is just keeps getting better and better, and dramatically so.

Now if you'll excuse me, I got some pinball to play...

Sunday, March 10, 2013

Sizzling The Zizzle

As mentioned earlier, the play field is a little sparse and needed a few things to spice it up. Here are a few cosmetic mods I've done so far (more to come later).

Before:

After:

Let's take a little tour of the play field, shall we?

Firstly I thought the slingshots needed some decals. Originally they were transparent with the green print of the play field surface showing through. They just looked boring so I made my own, picking up elements from the original teaser poster art. The jolly rogers are used for the targets, as well as the spinner.


Here are the newly adorned targets...


Added some store-bought decals to the back wall and the ramps.


For the skull ramp, I decided to sculpt my own skull out of Super Sculpey to make visual sense. When the machine yells, "Shoot the 'Skull Ramp,'" you know where to go.


For the spinner, I thought it would be great to have Jack the Monkey be sitting by it. This also makes better visual sense because whenever the ball moves through the spinner you hear a monkey cry (actually it's a chimpanzee call, but who cares). I made a crude, but acceptable Jack, again, with Sculpey, holing the cursed Aztec coin necklace. Yeah I know, wrong movie but again, who cares.


The latest mod I did was adding textures to the inside walls of the cabinet. I made some Photoshop composites of what gives the impression of Davey Jones' ship, the Flying Dutchman, complete with barnacles, starfish, and coral. Printed them out and mounted them. I think it really makes the play field come to life.


Added some pirate-themed labels to a couple areas. First one up is the canon battle ramp...


Also added one in the "Cannibal Island" area since I never felt the original labeling was very clear. And just to spice it up a bit more, I added a miniature die-cast canon I had sitting around.


One of my favorite touches... a replica Aztec coin from the original Pirates film mounted atop the ball-save bumper. It's high up enough above the height of the ball so it doesn't affect the ball path in any way.


That's it... for now...

New Flipper Buttons Go A Loooooong Way!

This was a pleasant surprise to me. While I know full well how unreliable the original stock flipper buttons were, I had no idea just how much of a dramatic improvement adding new buttons would be. More on that later.

So looking around the internet for a source for decent arcade-style buttons, I quickly realized I had to choose a more specialized design. The typical American arcade style buttons are typically fairly deep, further enlarged by an obtrusive microswitch. This design is perfect for thick wood control panels for arcade machines, but for this particular application they would be too bulky. Any arcade type button would make it necessary to drill a hole into the sides of the machine with the bottom button contacts visible under the glass right above the apron. I opted to look for Japanese style buttons which tend to be much slimmer and some have the microswitches built right into the button assembly.

As I wanted to do all these mods on the absolute cheapest I opted for these buttons at a mere $1.60 a piece.


I got them at a Chinese site called Deal Extreme (www.dx.com). If you haven't been to this site, I just ruined your life! They got all sorts of D.I.Y. stuff as well as toys, electronics and more for ridiculously low prices and free shipping. Anyway, enough of the commercial, the buttons are noted as being available in assorted colors; red, yellow, or green... either of which would have looked just fine for the color scheme of this particular machine. Reds, greens and yellows are prominent throughout the play field. From the looks of things, it looks like all they have had for a while is yellow. Again, looks fine and goes with the color scheme (though I would have loved red).


Check it out! Fits perfectly in the original button assembly! All I had to do is drill two holes on each side of the cabinet. One for the button, and one small hole for the wiring. 


The button contacts are exposed of course, but I don't particularly think they are much of an eye sore. I was contemplating making a covering for them but for right now, not a priority. The left button (seen above) takes a little room away from the cardboard apron and pushes it down just a little, but not enough to look terrible.

The result? I can't even begin to tell you what a difference these buttons made! The originally weak and unresponsive flippers seem to have taken on new life and send the ball all over the play field with ease. They are also wonderfully responsive now. Dare I say I could probably now make trick shots with a little practice. This was probably the most dramatic and effective mods to this machine. I'd probably go out on a limb and say that nearly every single case of people experiencing bad flipper control on these machines can be chalked up to the horrid original button assemblies. They are literally garbage.

At this point I can come to a pretty definitive conclusion. In response to all the haters, I can understand their frustration. When you buy something you shouldn't expect to have to do some work on it to make it useable. On the other hand, I can't go so far as to dismiss Zizzle's pinball machines as absolute garbage, as I've noticed so many people calling them. Many feel putting any time into these is a waste of time and that paying any more than $50 for one (ouch!) is throwing money away. I wholeheartedly and sincerely beg to differ! It's a great little machine, though hindered with inherent design flaws that are easily fixed. Also, many fail to keep their expectations at a reasonable level. This is first and foremost a toy, plain and simple. Once should never expect these machines to perform at a level that even holds a candle to a multi-thousand-dollar commercial unit. For a toy, and for the price, it's impressive on all fronts.

For those who want a good pinball machine on the cheap out of the box... you're out of luck. But if you're willing to get your hands dirty and do a few simple (and let me emphasize cheap) modifications, and don't forget that it's a toy, you'll be happy. I can't speak on the fact that some of these were known to simply die after a few plays. This may be true on some faulty samples. In my case, I've played mine for hours at a time... my wife can tell you, with no problems whatsoever. Hopefully it'll stay that way.

I hope so far this blog has inspired anyone who's on the fence, or currently own a Zizzle pinball machine who wish to improve on its performance.

Now... onto the cosmetics....

Fixing Ball Drain Issue

This was perhaps the simplest mod. There are three bumpers with a rubber band around them just under the pop bumpers. These, as many other Zizzle owners believe, are superfluous. I removed the bottom most one, drilled a hole between the flippers and placed it there. The ball still freely falls on either side of the bumper, but it's far easier to save the ball from draining.


Interestingly, the ball-save bumper isn't quite enough to save balls falling down from the "Cannibal Island" skill shot. After successfully making the skill shot, the ball will almost always fall between the flippers and the bumper, with no hope of saving it. Solution? Change the direction of the ball as it leaves "Cannibal Island".


If you look closely at the bottom of the image, you'll notice a piece of transparent plastic. You can also see its shadow on the surface of the play field. This was taken from a discarded product package, cut down to size (rounding off the corners). It sticks about an inch out from the ball exit and the rest goes above and around the two rubber-banded bumpers and taped to the inside wall of the machine. This basically become a kind of trampoline, lifting the ball upwards as it leaves "Cannibal Island" effectively causing it to land farther right of the play field. Simple, cheap, effective, and best of all, reliable and durable.

Last but not least are the ridiculously overexposed out lanes. The ball falls off here more often than not. Clearly something had to be made so I figured it would be simple enough to add a thin post that will act as a diverter so the ball can easily fall on either side, but narrowing the space that leads to the out lane. The idea is to give the ball equal chance to fall either way, not one way over the other.

I stopped at a local hardware store and found these...


These are called minifix screws. They are normally used in store-bought furniture. Add a properly sized rubber grommet and you got a pretty decent bumper post.


Again, the idea is not to cheat, but to give the ball equal opportunity to fall either to the return lane, or the out lane. Notice how low the lane rail is in relation to the slingshot. This might work for some tables, but in this case, it just doesn't play fair. This mod cost under $2 and already the machine is 100 times more playable.

Introduction

Howdy folks.

I've always been a lover of pinball games. I'd say a "fan" but these days, a "fan" can imply that I'm a total walking pinball machine encyclopedia who knows everything there is to know about these mechanical wonders, goes to tournaments regularly, has an extensive pinball machine collection filling all rooms of my house, etc., etc. I neither have the money, the know-how to maintain, nor the space to own a real commercial-grade pinball machine. So for years I've had to spend quarters to play them, or play electronic simulations of machines on home video game consoles and computers (many of them are superb). It wasn't until some years ago, I spotted a scaled down home pinball machine at a local Best Buy. It was themed to the then-new theatrical release of Disney's Pirates of the Caribbean: Dead Man's Chest. I was intrigued, and naturally, started to play. I immediately acknowledged its shortcomings, but also noticed how impressively designed it was, especially for what is essentially a toy. I don't quite remember the actual price tag but I figure it was around $299. Not bad, but I was pretty broke. Owning something like that was but a dream to not likely come true.


For the longest time I longed to have my very own pinball machine. Though due to the cost constraints, as well as space, I kept thinking about that little Pirates machine I saw back then at Best Buy. After a little research I found they were made by a company (now defunct) called Zizzle, a toy company who also held the license to produce many other Pirates toys. I also learned their pinball machines didn't sell very well and quickly were sold at reduced prices. Other models were offered, including a Marvel Comics themed version, a refreshed version for the next Pirates movie that followed (At World's End), as well as a planned but ultimately scrapped Atari themed version.

More research yielded some interesting information on their construction, quality, and flaws. Many people hate them. Others love them. Others enjoy them for what they are, a small cheap alternative to a real pinball machine. Also, after discovering how a few resourceful folks began to modify their machines to their liking, fixing things here and there to make it more playable, I was immediately inspired. I saved up some dough and set on a mission to get one. Finally scored one of these babies on Craigslist for $200 in good shape.

Not being one to be content to simply keep the machine as it left the factory, I simply had to do some modifications. Out of the box, I'll agree with most people who slam the machine with negative reviews, it's barely playable. Allow me to describe the most predominant issues these machines had that possibly ultimately killed what may have been a very successful product, as well as briefly describe what I did to fix these issues.

WEAK AND UNRESPONSIVE FLIPPERS:

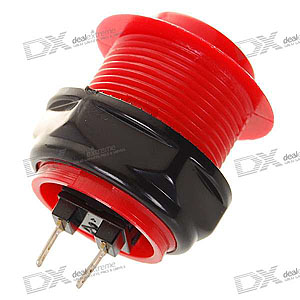
This is perhaps the most egregious part of these machines. I found that you had to be very deliberate when pushing the buttons to get the flippers to go when you want them to, otherwise, they either don't respond, or are slow and weak. Most have blamed the relatively low voltage solenoids (12V). But after some testing I later discovered that the solenoids powering the flippers are in fact powerful enough to effectively move the ball around the small play field. What was seriously impacting their strength and sensitivity was the horrendous stock buttons that activates the flippers. They look like full-size arcade buttons but inside is actually a tiny and very unreliable momentary switch. Replacing these with actual arcade buttons made a world of difference. The flippers react instantly as they should, and the ball moves much faster across the play field.

CONSTANTLY DRAINING BALLS:

This part is puzzling, as this is technically geared at younger kids who are not pinball pros. It is one hard game to play. Take into account that despite the ball being smaller than a regulation pin ball, the space between the flippers is ridiculously wide. Adding a ball-save bumper in the right spot between the flippers levels the playing field (no pun intended).

Adding insult to injury, the out lanes (the lanes located on the far sides of the bottom of the machine, causing you to lose a ball) are also far too wide open. Adding a simple bumper to help divert the ball, while still allowing it to fall freely on either side, helped tremendously.

SPARSE PLAY FIELD:

This is a mostly cosmetic issue. This machine could have benefited from just a little more decor. Some more lighting and miscellaneous decals would have jazzed up the design. Subsequent models following this one addressed this issue. I took it upon myself to sculpt some items, design and add a few decals, etc. As of this writing I've yet to add any additional lighting.

On to the mods...